MASTERING the French mani
Say au revoir to your French mani miseries as Kezia Parkins gets the lowdown from the professionals on how to conquer the art of creating this timeless classic
Have you ever had a client say that they are going to opt for something quick and easy, thinking they are doing you a favour, and then request a classic French? While clients might think the French mani is the quick and easy option, when it comes to nail art, the classic French can keep some nail techs up at night, not least because of the precision needed to pull off the design.
“I’ve been in classes where nail techs have cried because they didn’t want to do a French manicure,” says OPI educator Belinda Price. “I’ve been in salons and watched clients ask for one, and either be talked out of it, or told the salon doesn’t do it.”
“Despite its simplistic look, the perfect French can be far from easy,” says Joanne Quinn Geoghegan, owner of Beautorium, which is a beauty and skin clinic, and training academy in Waterford. “I'm still haunted by memories of clients asking for it when I was fresh out of college, but back then all we had to work with was regular nail polish, which was a lot less forgiving.”
“The assumption is that French is hard, but the reality is with a little practice, it is easy to achieve and can offer many benefits, such as increased turnover by charging for French as an add-on, and attracting new clientele who seek you out because you are known for it,” notes Price.
Common French faux pas
“A good French can be one of the hardest free-hand services to offer,” explains Catherine Jimenez, Gelish educator and home salon owner. “It involves a steady hand and making sure the smile line is crisp, clean, curved and suits the nail you are working on. I see a lot of smile lines that are straight across, which isn’t flattering. The other challenge is getting the points of the smile line to be at the same level on the sidewalls, and then for the middle of the curve to be at the centre of the nail.”
“French manicures are designed to reflect the natural nail and give a clean, healthy look, therefore it is very important to get a precise smile line when doing one,” says Quinn Geoghegan. “With the amazing two-week polish products we have now, creating the perfect line is much easier.”
Correct colour
Choosing the right base colour is important to achieve the perfect French mani, advises Julie-Anne Larivière, a Salon System nail expert and owner of Sketched by J-A Nails in Kent in the UK. “For fair skin tones, I like to use a sheer pink or a creamy pink; for medium or olive skin tones, a pale taupe, or a soft peach; and for dark skin tones, a rose beige or a cocoa-mocha tone.”
‘French manicures are designed to reflect the natural nail and give a clean, healthy look, therefore it is very important to get a precise smile line when doing one’
“Not all products are equal,” warns Price. “Some pink shades discolour, and some whites go yellow, stain or chip. For best results, use the whole system of one brand, with a matching lamp.”
“The order of the polishes depends on the overall look you want to achieve,” says Quinn Geoghegan. “Go with pink/ beige first, then white if you are opting for the whiter-than-white effect, And apply white before colour if you want a more natural or nude effect.”
The right brush
All of the experts have found a friend in their liner/striper brush, which has become the key to helping them achieve their French. Many favour a length of around 11mm to achieve a deep smile line and seamless curve.
Gelish educator and home salon owner Jenni Hession likes to use a gel striper brush for creating the fine lines of the French, and a square gel brush to wipe away any excess gel polish and perfect the smile line if needed. “I can always go back in with my mini gel striper brush if needed to make the lines more crisp,” she adds. “Never overload your brush – very little product is needed for a French manicure.”
If any cleaning up is needed, Jimanez uses a gel brush with a little bit of top coat on it. “This helps my brush glide over the nail plate, while maintaining the crispness.”
“Look after your brushes,” advises Price.
“If you use a nail art or clean-up brush, take care of it, and keep it just for French, so no glitter or dark shades can contaminate your product.”
Product power
The consistency of gel polish can sometimes make detailed or precise nail art like the structure of the French mani tricky. That’s why gel paint commonly referred to as 'art gel' was invented.
Gel paints differ from gel polish as they are thicker and stay in place, whereas gel polish has a tendency to run in order to self-level. This makes it ideal for achieving thin and crisp smile lines.
Gel paint also often comes in a pot, rather than a bottle, and should be decanted onto a nail art palette to allow you to run a thin layer of product through the length of the brush to create long and crisp lines.
It can achieve a one-stroke application, which can help avoid the bulking tip issue many techs struggle with. So, if that's you, consider using a gel paint.
Mark it out
If you’re not confident about creating a clean and consistent design on all 10 fingers, then mapping out your French is a great solution. “Using a gel striper brush, I always start with two diagonal lines,” explains Hession. “This will determine how deep you want your French smile line to be. Then I draw a horizontal line at the point where I want the bottom of the arch to be right across the two you have already painted.”
The angle of the horizontal lines will determine how dramatic the smile line will be – closer to the side of the nail will mean a higher smile arch, and closer to the middle or crossing over will create a lower arch.
After drawing the horizontal line, you will have an angular outline of the French design. Then use your liner to soften the smile line and fill in the gaps.
Jimanez also likes to draw a template first. “I draw one line in the centre of the nail, with two either side and then dots at equal lengths down the sidewall,” she says. “I then draw a line connecting the dots on the sidewall to the ones either side of the centre, and then a line across each of these. I can then soften this to create a central even smile line and fill it in with the gel polish. Do not apply your colour too thickly. It’s much better to build it up gradually.”
‘If you use a nail art or clean-up brush, take care of it, and keep it just for French, so no glitter or dark shades can contaminate your product’
If you can use one coat for the French design with gel paint or polish, then you will have less chance of the product bulking at the tip or in other areas. Otherwise, a clean brush can be used to remove some excess. Don’t forget to flash cure in between fingers to avoid your previous artistry getting smudged.
Manage expectations
It’s important to educate your clients on the work that goes into your art to keep them happy and returning. This also helps them book in the right treatment time and understand your prices. The benefits include increased turnover, along with new business.
“Become slick at French application and you will soon be cheering when clients ask for it, rather than shying away,” says Price.
“The French manicure is a timeless nail design that has lasted throughout the decades,” says Quinn Geoghegan. “Perfect for any event, it also suits most tastes. It remains the constant go-to option for bridal nails and for occupations that do not allow coloured polish. So the French manicure is definitely a technique to master because it's here to stay.”
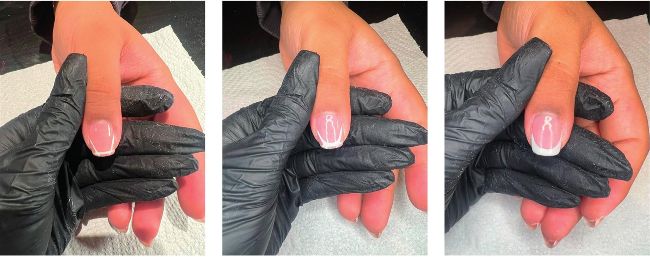
STEP-BY-STEP FRENCH MANI MAPPING
BY JENNI HESSION